Tuesday, March 5, 2013

Chaos Daemons - Test List - 1500


So after a few days I have my first concept list for the new Daemons. It owes alot to my successive Tyranid swarms, both in the wave concept and in relying on Biomancy to get by.

HQ:

Great Unclean One w/ ML 3, Greater Rewards x2, Lesser Reward - 290

It's not cheap by any means, but with a little luck can be even more durable than the previous incarnation, and much more dangerous. This thing will live and die by rolls on the Greater Rewards and Biomancy charts. It has enough chances to get something useful each game, but that may not be enough to justify its inclusion.

Herald of Nurgle w/ ML 2, Lesser Reward - 105

Herald of Nurgle w/ ML 2, Lesser Reward - 105

These two will always be rolling on Biomancy, and will hide in the Plaguebearer squads while throwing out blessing and maledictions. The etherblade won't save him or his buddies from a dedicated combat unit (or even a moderately decent generalist unit) but will make him a credible threat in challenges or let him whittle down/finish off a character. Enfeeble and Endurance will be used to buff the Slaaneshi units and debuff their targets.

Troops:

10 Plaguebearers - 90

10 Plaguebearers - 90

Both of these units are designed for rear and midfield deployment, objective sitting, and babysitting the Heralds.

15 Daemonettes w/ Alluress, Lesser Reward - 145

15 Daemonettes w/Alluress, Lesser Reward - 145

These will be the secondary assault wave and forward objective holders. They're fragile, but can still hit hard, and the Alluress has a reasonable chance of ending most squad upgrades.

Fast Attack:

10 Seekers of Slaanesh -120

10 Seekers of Slaanesh - 120

These are the first wave. They're fragile, but if they aren't destroyed by the opening shots, they should be able to cause some sufficient mayhem for the Daemonettes to get into my opponent's lines unmolested.

Heavy Support:

Soulgrinder w/ MoT - 140

Soulgrinder w/ MoT - 140

They aren't magnificent fire support, but they can swat flyers, break open transports, resist all but heavy anti-tank fire, and defend themselves passably in melee.

Thoughts?


Tuesday, February 12, 2013

Tyranids - The Basic List.

Long time, no nothing. Blogging has slowed to a crawl over the last few months, but I promise I'm still playing and working on additional posts. The Tyranid Tactica I've been mentioning off and on since the summer is still coming along, and I've been putting the swarm through its paces.


 Here's what I've been running for the last few months.

HQ:

Hive Tyrant w/ Biomancy, TL BL devourers x2, Armored Shell, Tyrant Guard - 300

Hive Tyrant w/ Biomancy, TL BL devourers x2, Armored Shell, Tyrant Guard - 300

Elites:

2 Hive Guard - 100

Troops:

20 Termagants - 100

20 Termagants - 100

18 Termagants - 90

Tervigon w/ Toxin Sacs, Catalyst, Dominion, Stinger Salvo - 185

Tervigon w/ Toxin Sacs, Catalyst, Stinger Salvo - 185

Fast Attack:

4 Raveners w/ scything talons & rending claws - 140

I'm very pleased with the list's performance so far. Conventional Tyranid wisdom seems to be to never pay for Termagants, but they're so cheap, and provide some consistency to the spawned numbers that the Tervigons can put out. The Tervigons usually keep Catalyst and Dominion. While the Biomancy powers are great, they are also random, and the ability to give the Tyrants Feel No Pain is too good to leave to chance.
         
 The Tyrants themselves are the lynchpins of the list. While only moderately effective in melee, they can shred infantry and medium AV vehicles at range, and are absurdly difficult to kill. Stacking cover, FnP, and possibly Iron Arm or Endurance can allow them to absorb an entire army's worth of shooting, especially if they haven't prepared for taking down this sort of target.

The Raveners were a late addition, but I've been pleasantly surprised with their performance. The rest of the list is fairly slow, and they add some ability to move across the board rapidly. Even better, they're one of the few Tyranid assault units that isn't completely screwed by terrain - while they still strike at Initiative 1 charging through it, they can move through it normally.

Saturday, October 20, 2012

Another Apocalypse


More on the Tyranids in 6th Edition coming up. It's been a busier month than I'd anticipated. And now for your viewing pleasure (and possible eyestrain), some pictures from today's Apocalypse game -  Eldar vs. my Slaaneshi Daemons.


Each of us brought 3000 points, a single Superheavy, and chose one Strategic Asset. We agreed to set up and role off as normal, since Daemons have a slight advantage using the Apocalypse time bidding system. I won, and chose to go first, since my Superheavy, a Subjugator, would have to start on the table and could conceivably get a first turn charge...


It worked! It worked, now cower before my... ummm... guys...? guys?!
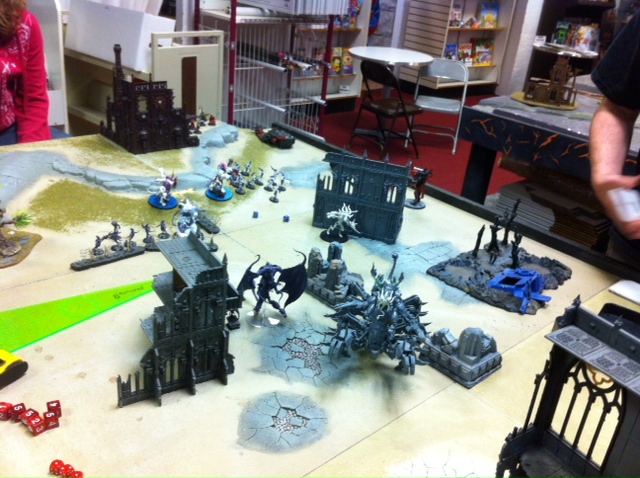
As I'd hoped, the Subjugator was able to make a first turn charge into my opponent's screening Seer Council before they got a chance to cast Fortune. It didn't make a difference. The Council and Farseer, despite the lack of any buffs, tore off nearly half its hull points with their Witchblades, and took only a few casualties despite a Hellstorm template to the face followed by a Stomp attack. The Subjugator's Tormenter Cannons killed a few, but not nearly enough, of the Wraithguard behind the Council, while the Blastmaster scattered off the Disruptor Beacon (the small black tower) and stripped a hull point off my opponent's Superheavy, a Lynx. Speaking of the Beacon, note the lack Daemons in this shot. Most of them got moved into a corner on the opposite side of the board. Only the Daemonettes in the ruins will be in a position to do anything next turn.

Not cool guys, not cool.
The picture speaks for itself. A salvo of Divination guided shots from the Wraithguard wrecked the Subjugator, which ironically left most of their guns out of range of my army. With LoS to only a few of the Daemonettes, the rest of the Eldar turn and obliterate one of my Heralds, then strip half the wounds from the other.

The right flank on Daemon turn 2. Only 3 units made it through the beacon, but they're the ones I would have chosen. In the upper right, the Daemonettes assaulted through the ruins and wrecked 2 of the 3 Warwalkers. Everyone else prepares to get shot.
The rest of the Daemon force showed up on turn 2. Unfortunately, with the Beacon still in play, over half of them end up as far as way from the action as possible. Shooting does little damage

Ok guys, let's try this again! Praise Slaanesh for the Replacements strategem! Incidentally, every other unit in this corner is supposed to be in midfield, blocking those Wave Serpents filled with Dire Avengers. Thanks again, Disruptor Beacon!
Most of my army is still out of range on the Eldar 2nd turn, save for the 3 units that got past the Beacon and the Daemonettes, who are at half strength after one of the Warwalkers exploded. Most of my army is still out of range,although a little more than half of what is has been exterminated.


The main body of Eldar, at the end of Daemon turn 3. The Bloodcrushers lost only 1 despite being hit by both of the Lynx's Pulsars; in return they managed to explode the Fire Prism that had crept around the ruins. The plan here was to multiassault Eldrad and the Wraithguard, but it failed. The Seekers didn't get the distance, and the surviving Daemonettes and lone Fiend failed to put a dent in them. Miraculously 2 Daemonettes survived to lock the unit in assault.


The other side of the board, also turn 3. Most of the objectives are on this side of the board, fortunately for me. Everything in the corner rushes forward, trying to stop the two Wave Serpents just off screen.


Bottom of Daemon turn 4. The Bloodcrushers finished off the wounded Wraithlord after it charged them, but are close to being wiped out. I've had a little more luck on the opposite flank. The Subjugator managed to assault and wreck one of the Wave Serpents, while combined shooting from the Daemon Princes, and its Sonic weapons managed to wreck the other.

Long shot of the table, around turn four. Daemonettes and a Keeper of Secrets are advancing on  one squad of Dire Avengers, while the other squad scrambles to get away from the Subjugator bearing down on them. With little to lose, the foremost Avengers advance, and manage to blast the Plaguebearers off an objective. 
At this point we called it. With the Dire Avengers gone and only one scoring unit remaining, the Eldar had no way to outscore the Daemons, and too few units to contest. For a moment on Turn 5 it looked like the Seer Council might be able to do it, but they were finally torn apart by 2 units of Horrors, the Subjugator, Fateweaver, and a pair of Daemon Princes.


Wednesday, September 12, 2012

A Guide to Tyranids in 6th Edition: Part I

With the near simultaneous release of the latest round of FAQs and the conclusion of the first major US tournament, it is safe to say that 6th edition has fully arrived, and we can all get down to the business of figuring out our favorite tabletop game. With that in mind, I'm returning to the project I fitfully started over the summer: a complete breakdown of the Tyranid Hive Fleets in all their glory.

Let's begin with the most basic of questions: "Why collect a Tyranid army?"

     First, because the Tyranids are unique among 40k armies. Their model range and unit selection are incredibly diverse, and offer opportunity after opportunity to create a unique swarm. This is made even easier by the large number of plastic kits, all of which have surplus parts that can be easily repurposed.  Secondly, Tyranids embrace a number of Sci-Fi alien themes. If you're a fan of skittering hordes, stalking predators, unstoppable titans, or inhuman intelligence lurking in the darkness, then the Tyranids are for you. And finally, you should collect Tyranids because they are absolute killing machines on the tabletop.

And that segues nicely into the next, more practical sections: general strengths and weaknesses.

Strengths: 

If it bleeds, the Tyranids can kill it. Messily. Virtually every Tyranid unit is good at killing infantry, either through volume of attacks and shots or by ignoring armor saves. Massed Tyranid shooting can be devastating, while even their weakest units are threats in assault. Their assault specialists are amongst the best in the game. Few models can go one on one with a rampaging Trygon or Hive Tyrant, and fewer still can hope to survive. A model out in the open and near any Tyranid unit is never safe.

Numbers are another Tyranid advantage. While the codex has its share of expensive solo models, it can compensate with multiple cheap Troop choices - some of which can literally be spawned for free on the battlefield. Even worse (for your opponent) many of these models are Fearless in their own right, and all of them can be made so by nearby Synapse creatures. Not only is it possible to outnumber your opponent two or three times over, but each and every one of those models will have to be destroyed.

Tyranids can also deploy psykers to the battlefield en masse.  While most are only Mastery 1, their sheer number can ensure that a given power is available. The right combination of powers, particularly those on the Biomancy table, can make Tyranid units exponentially more dangerous. Even basic powers, such as Catalyst and Paroxysm, can change the outcome of the game. As a bonus, proximity to Tyranid Synapse creatures will also make enemy psychic powers much less reliable.

Finally, Tyranids can do multidirectional attack like no other army. Many of their units can Deepstrike, Outflank, Infiltrate or simply appear from nowhere. Even better, they can do so while still maintaining an intimidating presence on the tabletop. If you choose, your opponent will have to worry about the swarm rushing his lines and the units waiting to ambush him.

Weaknesses:

Unfortunately, there are some things the Tyranids do not do well. First and foremost is surviving. Invulnerable saves are almost unheard of in the Tyranid army, and 2+ saves a rarity. You will find nothing with a 4+ save cheaper than 23 points. Toughness maxes out at 6, and while there are numerous models with multiple wounds, they are all vulnerable to Instant Death, focused heavy weapons fire, or both. No other army relies on numbers, exact positioning, and good use of cover so heavily. A Tyranid unit out in the open that your opponent wants to destroy in a given turn will be gone by the end of that turn. Broods that don't get the first shot or that can't take advantage of their high initiative will lose models and hitting power. Beware assaulting large squads in cover, as Overwatch, followed by strikes at Initiative 1 can often be the difference between victory and defeat.

Another weakness is a flip side of a strength. While Tyranids benefit greatly from their psykers, there are armies that can shut them down even at range, leaving the swarms that much more vulnerable and unable to retaliate.

Finally, the Tyranids have real deficiencies in their ranged firepower. While they have great mid and short range anti-personnel shooting, they have little in the way of long range firepower, and struggle to bring down some vehicles. A Tyranid swarm that relies solely on ranged firepower is likely to be outranged, whittled down, and outshot once it reaches its optimal kill zone of 18"-24". Tyranids possess some excellent weapons for destroying vehicles, but they tend to be more specialized, short ranged, and expensive than their counterparts.

Next installment: Terrain Setup, Warlord Traits, and Psychic Powers


Monday, August 27, 2012

Theorycrafting

So, more an invitation to discussion and theorizing than an actual blog post this time. Over the last few weeks, it seems that everyone and their dog has been throwing around some combination of Grey Knights and Necrons as the new thing to beat in competitive play. My question is, why?

Either codex could make a case for the "strongest" on the market right now, but their strengths are fairly similar: decent long range options, brutal mid-range shooting, excellent assault units, general durability, and abundance of useful vehicle hulls. Neither codex really has anything the other can't already do, and their synergy is limited by the Ally table and the redundancy necessary to take allies in the first place.

Am I missing something?


Sunday, August 19, 2012

6th Edition Tyranids - Mark II

As my game count in 6th edition steadily rises, I've been making some refinements to the last 1500 list. Here's the next iteration I hope to test out.

HQ:

Hive Tyrant w/ Biomancy x2, scything talons, Wings, TL BL devourers, Hive Commander -270

My earlier enthusiasm for the unit is starting to wane. It is every bit as destructive as I thought it would be, but it lives and dies by grounding tests and psychic powers.

Tyranid Prime w/ scything talons and dual boneswords - 90

This guy will be shepherding a unit of Termagants, either on a rear objective or outflanking via Hive Commander.

Elites:

8 Ymgarl Genestealers - 184

These units are so useful they're starting to feel like a crutch. Arriving on a 2+ thanks to Hive Commander and able to move and assault during the same turn, at least one unit has gotten into assault on Turn 2 every game I've played thus far. While expensive, they can cause outsized disruption via actual damage and dictating your opponent's deployment.


Troops:

20 Termagants - 100
20 Termagants - 100
20 Termagants - 100

Not much to these guys. Scoring units, bullet catchers, and tarpits. While only an actual threat near a Tervigon, blocks of 20 Termagants take some serious firepower to destroy.

Tervigon w/ Biomancy x3, Stinger Salvo, Crushing Claws, Toxin Sacs, Adrenal Glands - 235

Tervigon w/ Biomancy x3, Stinger Salvo, Crushing Claws, Toxin Sacs, Adrenal Glands - 235

This loadout has proved surprisingly useful. In addition to buffing and creating Termagants, they can, via Biomancy, strip away hull points, boost nearby units, and become near unstoppable juggernauts in combat.

The basic strategy is just a 1-2 punch. The Tyrant and Ymgarls, possibly with some outflanking Termagants, represent an immediate threat that must be dealt with, while the Tervigons and Termagants rush forward to secure objectives, lock down dangerous units, and generally bury my opponent in numbers.

The lack of ranged firepower is deliberate. Tyranids cannot win a firefight against any other army, especially in an environment with MSU mech and fliers. What they do have is a multitude of Smash attacks, S4 hits to rear armor via Termagants, and enough mid-strength shots to strip away hull points at critical junctures.

Sunday, August 5, 2012

Feast of Blades

So, here's a quick breakdown of the Feast of Blades event my FLGS ran last weekend. Turnout was pretty limited, with only 6 people attending, but the back - to - back games at 2000 points provided a nice shakedown for my 6th edition Tyranids.

Representing the Hive Fleets:

HQ:

Tyrant w/ Wings, Hive Commander, Talons, Biomancy x2, TL BL devourers - 270

Elites:

8 Ymgarl Genestealers - 184

2 Hive Guard - 100

Troops:

20 Termagants - 100
20 Termagants - 100
20 Termagants - 100

Tervigon w/ Biomancy x3, Adrenal Glands, Toxin Sacs - 210

5 Warriors w/ rending claws, toxin sacs, devourers + 1 barbed strangler, in Mycetic Spore w/ Tl deathspitters - 260

Fast Attack:

15 Gargoyles - 90

Heavy Support:

Trygon - 200

Trygon - 200

Game 1:

In what's becoming a tournament trend for me, the first game was the closest and hardest fought. I drew Imperial Guard headed by Creed and backed by multiple heavy weapons teams, three Leman Russes, a few footslogging platoons, and 4 plasmagunning veteran squads in Chimeras. To make matters worse, the primary objective was kill points.

End of Tyranid turn 2, and it's gone pear shaped. The Trygon in the center scattered out of assault rangedof the armor below the ridge, and while one unit of Ymgarls is in amongst the heavy weapons, the other is offscreen, hopelessly out of position.
This game illustrated the weaknesses of a Tyranid list handily. While I was able to close rapidly and start claiming kill points by turn 2, I was never able to pin my opponent down. The Termagants were little more than targets for most of the game, and my opponent was able to use his mobility and firepower to prevent me from overwhelming him. By the end of the 2nd Guard turn, the Hive Tyrant and closest Trygon were dead, and it was apparent that it would be several turns before my footslogging swarm hit his lines - if it lived through the storm of shells and plasma.

Ultimately the game was decided by the melee combat on the ridge. The Guard were on course to table me, but would have probably needed 6 turns to do it, and it was apparent we were only going to get 4. On turn 3,with us tied on kill points, the Ymgarls locked in combat with the survivors of a few heavy weapons teams, and my Warriors lurking behind the ridge, Creed gave himself and two other squads Furious Charge and assaulted both the Genestealers and the Warriors. The resulting combat saw all the Guard squads eliminated, with Creed falling to the second Trygon as it finally got into assault range. The Guard's return fire subsequently scoured the ridge of Tyranids, but it was too little, too late. Time was called at the bottom of Turn 4 with the Nids up 7-9.


Game 2:

After a narrow win in round 1, I was paired off with a Chaos Marine player in a table quarter (actually quintet) scenario. My opponent field 3 Plasmagun toting Plague Marine squads, 2 squads of 3 Obliterators, a Slaaneshi Lord and Terminator retinue riding in a Land Raider, a Vindicator, and a pair of Dreadnoughts.

Once again, Tyranid turn 2. The Vindicator is down, as are 2 of the 3 Rhinos ferrying the Plague Marines.

This game was fairly straightforward. My opponent set his troops in a loose line across the center, and split his ranged firepower between the two corners of the board. Extreme range and Nightfighting protected everything but the Gargoyle screen, and I concentrated on pushing forward. Although my Ymgarls could have easily assaulted each squad of Obliterators, that would have been suicidal - Powerfists + 3d3 heavy flamer hits from Overwatch would have likely crippled them. Instead one squad took out the Vindicator, while the other tore open a Rhino.

Chaos return fire saw both Genestealer squads incinerated and the Hive Tyrant dead to plasma fire, but by then it was too late. The Warriors overwhelmed the central Plague Marine squad, then spent the rest of the game supporting the Hive Guard in a firefight with the Dreads, Obliterators, and stranded Marine squad.  They took the worst of it, but kept all of those units penned in one table section. The other squad was surrounded by Termagants and finished off by a Trygon, while the other rampaged through a Land Raider and the Terminators inside. The game ended on turn 5 with the Nids up 3 sections to 1.

Game 3:

The final game was against a Black (Red) Templar force in a 5 objective mission. My opponent went assault heavy, with a 6 man Missile/Plasma squad, two Crusader squads in Land Raiders (one a Godhammer with the Emperor's Champion, the other a Crusader with Marshall Helbrecht). Backing them up were a Dakka Predator, a Landspeeder, and a large squad of Tactical Terminators backed by a Chaplain.

Black Templar Turn 2, as Helbrecht and co. disembark. It doesn't look like it, but there are a lot of dead Gaunts already. And they're going to have company soon.
 This game got ugly quickly. Templar fire tore a hole in my Gargoyle screen and killed about a quarter of the Termagants before I even got a chance to move. TheTyranids were not to be outdone, however. On my Turn 1, the Termagants advanced towards the objectives, while the Hive Tyrant Vector Struck the Landspeeder into the dirt, then wrecked the Predator via Devourer hits to the side armor.

Turn 2 saw the game turn decisively against the Templar. Their return fire killed only a few more Termagants and wounded the Tyrant. Helbrecht's squad killed a few Termagants via shooting, then catastrophically failed their charge roll, getting only 5" and losing the only model in range to Overwatch shots. On the Tyranid half of the turn, all of my reserves arrived; the Trygons bracketed the Godhammer, the Warriors touched down next to the Terminators, and the Ymgarls burst from cover in front of the squad on the hill. By the end of the turn, Helbrecht was locked in a challenge with a S8/T9 Tervigon, half the Terminators were dead, and the fire support squad was annihilated.

Full credit to my opponent at this point. With his army crumbling, he kept the objectives in mind and proceeded to mercilessly scythe down my scoring units. The surviving Terminators rushed the Warriors, while the Emperor's Champion and company blitzed both of the unengaged Termagant squads, wiping them out. Only luck allowed the Warriors to hold out long enough for the Trygon and Genestealers to rescue them, and they were the only surviving troop choice - fortunately they'd been fighting on an objective the entire time. While I was able to destroy both Land Raiders, their combined firepower was enough to wipe out the depleted Termagant squads once they had finished off Helbrecht, and I foolishly held the Tervigon back to help the Tyrant wreck the Crusader.

Ultimately I tabled my opponent, winning a narrow victory on the primary objective, but gaining most of the secondary objectives via maneuvering on Turn 6.

Those 3 wins were enough to take 1st place with the Tyranids, something I never managed to do in 5th edition. Not a bad way to start.

Overall I think I'm pretty happy with the Tyranids' performance. I made some glaring placement/movement errors, particularly in the first game, but was able to recover. The basic concept of a large footslogging wave backed up by reserved disruption units worked well, although I've got to get better at coordinating the moment of impact.